The Fintech Portal is a modern, streamlined application that allows retailers to process invoices more efficiently. Improvements from the Legacy (FMS) Portal include a simplified process for paying invoices, managing vendor relationships, and updating bank accounts.
⚠️ Your company may have access to some or all of the features listed below, depending on the subscription plan or if you have access during a trial period. For general information regarding plans, see Subscriptions FAQ or go to the Plans & Billing page in the Portal.
Jump to a section in the article:
Non-Alcohol Invoices (Subscription Required)
💡Click here to view a complete Fintech Portal navigation guide.
Home
The Home page provides an at-a-glance view of activity across your account. Widgets display key information such as invoices received, spending trends, upcoming transactions, recent payments, and tasks that may require attention. Many widgets include quick links that take you directly to the related page in the Fintech Portal: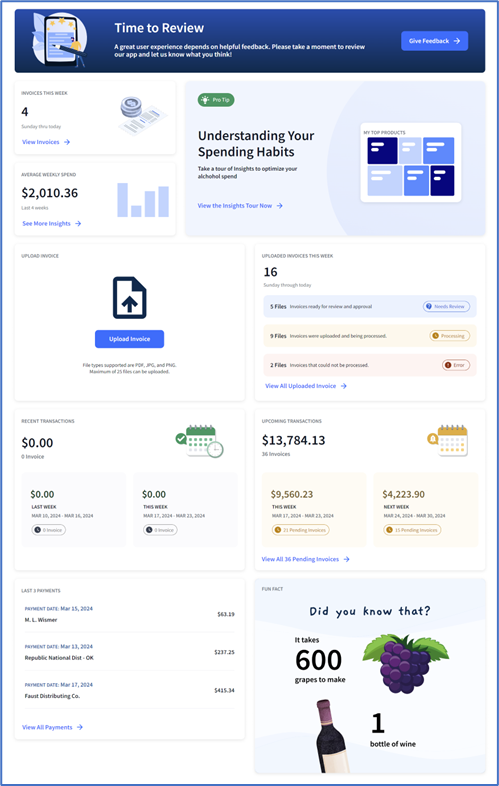
Learn more about the Home page and widget information here: What does the Home Screen tell me?
Viewing Invoices
If you have a Lite or higher subscription, view a list of invoices you've received in Invoices > My Invoices.
The table defaults to show the last 30 days of invoices. Use the search bar to find invoices by vendor name, invoice number, or invoice amount. Sort by payment status, vendor name, or user upload name (for non-alcohol invoices only), and save selections as your default filters using the filter on the right side of the search bar:
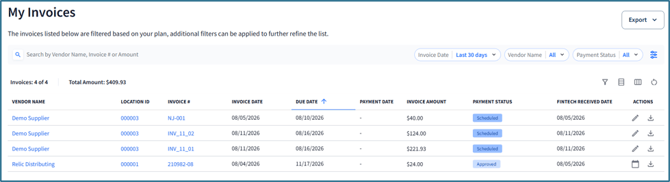
Learn more here: How do I see all of my invoices?
Viewing Invoice Details
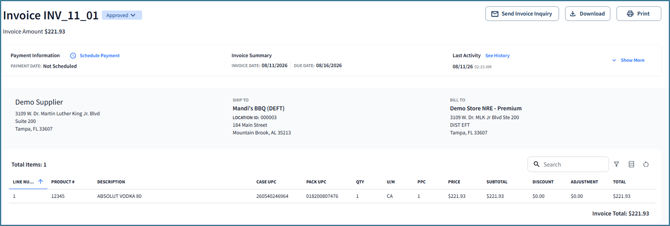
With a Lite or higher subscription, click on a row within the table to view a digital copy of the invoice or download a PDF version. If you are managing non-alcohol invoices, you can also schedule payment:
Paying Invoices
Depending on your plan, invoices can be paid a number of ways.
-
For alcohol (regulated) invoices, payment is made via EFT only.
-
If you have a Premium subscription, you can pay non-alcohol invoices by ACH, check (using Fintech's service), or even outside of the portal using your own arrangement.
For more information regarding payment preferences and set up, click here: How do I add or change Bank Accounts?
Non-Alcohol Invoices
To upload, edit, approve, or pay non-alcohol (non-regulated) invoices, you will need a Premium or Premium Plus subscription. If you are not on either of these plans, you will not have access to the Invoices > Manage Invoices in the Fintech Portal.
Premium plan subscribers can upload and approve non-alcohol invoices, while Premium Plus subscribers can make payments in the portal.
Learn more here: AP Automation | Fintech Automated Invoice Processing.
Uploading Non-Alcohol Invoices
To upload a non-alcohol invoice:
- Go to Invoices > Manage Invoices.
- Click the Upload New Invoice button.
- Select the location the invoice is for.
- Drag and drop the invoice file or choose to Browse Files on your computer.
⚠️ You can upload up to 25 files at a time, and files must be in PDF, JPG, or PNG format.
- Click Done once the file has completed uploading.
Files will show in Invoices > Manage Invoices within 24-48 hours after upload. For more information regarding processing time, click here: Where do I upload and manage my invoices?
Reviewing and Editing Non-Alcohol Invoices
- Go to Invoices > Manage Invoices.
- Click on row within the table to open the invoice editor.
- The editor splits invoice information into smaller sections to edit (sections 1 - 3). Invoice details will auto-populate in the text boxes of each section, which you can review and edit if needed (i.e., vendor, location, product information, payments, etc.):

- In section 3 (Schedule Payment), you can choose to schedule a payment now or later.
💡 Read more about payment scheduling here: How do I schedule payments as soon as I approve an invoice? or How do I schedule payments at a later time?
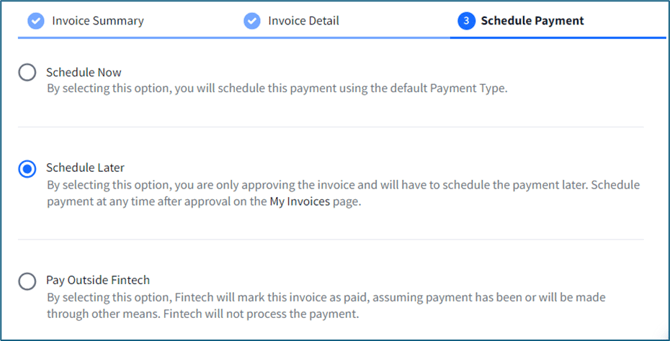
- Review the invoice details, then click either Back to Edit to return to the invoice editor or Approve to complete the editing process.
Data from the invoice will move into your company’s back-office system for further processing. For more information on editing invoices, click here: How do I make changes to a vendor invoice?
Vendor Relationships
View all current vendor and distributor relationships within Vendors > My Vendors. From this page, you can:
- View all current vendor and distributor relationships.
- Track relationship setup.
- View vendors by company or by location.
- Open vendor profiles to review contact information, serviced locations, invoices, and payment methods.
- Export vendor relationship data for reporting purposes.
Learn how to manage current relationships here.
Adding a New Relationship
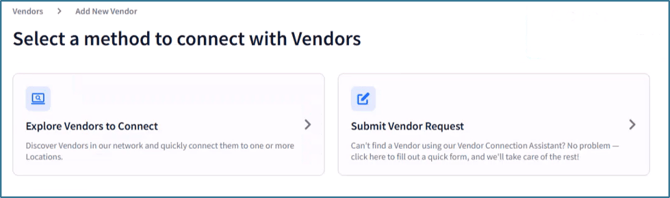
If you need to establish a new vendor or distributor relationship, go to Vendors > Add New Vendor. From there, you can search for vendors already participating in Fintech's network or submit a request for a vendor that is not yet participating.
To add a new relationship:
- Go to Vendors > Add New Vendor and click Explore Vendors to Connect:
- Select eligible locations.
- Search for vendors by name, category, or vendor type.
- Review the selected vendors and assigned payment methods.
- Submit the relationship request.
After submission, relationship status updates can be monitored through Relationship List View . Learn more: How do I add a new vendor?
Managing Bank Accounts
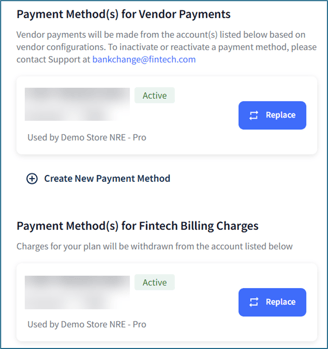
The portal's Settings > Payment Management section lets you handle the payment methods for invoices and also for your PaymentSource subscription.
For more detailed instructions, click here: How do I add or update a Bank Account?
Updating a Bank Account
⚠️Only business checking accounts can be used for payments.
⚠️ If you are using the same bank account to pay invoices and your PaymentSource subscription, you will need to update them separately.
To update an existing bank account in the portal:
- Go to Settings > Payment Management.
- Click Replace on the bank you'd like to change:
Need Help?
If you have further questions or need assistance, please contact Client Services.