
Managing Vendors
If you are setting up your Fintech Portal account, approving a vendor relationship is necessary for your account to go live.
Within Vendor > My Vendors, you can:
- See all vendors at a glance.
- Drill into details (such as locations served, vendor contacts, etc.).
- View invoices sent to a location, as well as the payment method to the vendor.
⚠️ To remove a vendor, contact Client Services: activation@fintech.com.
The table shows all vendors that supply a company with regulated and non-regulated products. View vendor relationships by company in Vendor List View or by location in Relationship List View:

In Vendor List View, view vendor relationships by company, how invoices are sent (Invoice Source), and the number of locations a vendor delivers to per company. Click on a row to open a vendor's profile.
Relationship List View shows vendor relationships by location, as well as location details, payment information, and the status of the vendor relationship. Click on a row to learn more about a location.
If your company uses PaymentSource to manage both regulated and non-alcoholic invoices, you can filter the table by clicking the Filter icon and select a Vendor Type:


Vendor Relationship Status
The status column groups the total active locations by status type, which are defined by:
|
Status |
Definition |
|
Awaiting Distributor or Vendor Approval |
The distributor/vendor has yet to approve a relationship request from the retailer and cannot be sent another invite. If they are not responding to the invite, contact them directly. |
|
Awaiting Retailer Confirmation |
The retailer has yet to approve a relationship request from the vendor. |
|
Pending Payment Verification |
This step is skipped if a bank account has been verified or does not use debit or ACH filters. |
|
Awaiting Live Date |
A relationship is set up and will process when Fintech receives the first invoice. |
|
Active Not Processing |
A relationship is live, but invoices have not been processed yet. |
|
Processing |
Invoices are currently being processed through Fintech. |
|
Active |
The vendor accepted the relationship request and invoices are being processed. |
|
Inactive |
The retailer requested the vendor to stop processing through Fintech. You can send an invite to a vendor with an Inactive status by following the vendor invitation process (Add a Vendor to Fintech). |
|
Declined |
The vendor declined to set up a relationship with the retailer. Contact your Fintech Admin to learn more. A relationship request cannot be sent again once Declined. |
💡 If a vendor status is not listed but invoice processing is occurring, it can be assumed that the relationship is Active.
Vendor Profile
Click on a row to see further information regarding the vendor, including:
- View location details - Click on a tile within the Locations area in the middle of the page (Contact information, assigned vendor Customer ID, recent invoices, etc.). For more information, see: Locations.

- View invoice details - Click on a tile within the Invoices area at the bottom of the page. For more information, see Invoices.
- View the most purchased products - Scroll down to the Top Vendor Products table. If you have not previously purchased products from this vendor, this table will not appear.

- Add the vendor to your other locations - Click the Add button on the row of the location the vendor serves. This table will only appear if more than one location has been registered.
- For more information on adding vendors to locations not listed in this table, click here: How do I add a vendor to a location?
Changing Bank Accounts for a Vendor
If you use more than one bank account to pay invoices and wish to switch:
- Go to Vendors > My Vendors and select a vendor from the table.
- On the next screen, click a location tile within the Locations Served section.
💡 On the bottom of the next screen, look for Payment Method and click the pencil icon. The pencil icon will not be available if only one bank account is registered with the account.
- Select the desired bank account.
If you don’t see the bank account, go to Settings > Payment Management and make sure the account was registered and active. For more information, see the article: How do I add or change bank accounts?
Editing Vendor Details
Vendor Name
⚠️ To edit a vendor's name, you must have a Premium or Premium Plus subscription and upload non-regulated invoices. Only vendors associated with these invoices can have their names edited. Name changes will apply to all invoices, including those already approved.
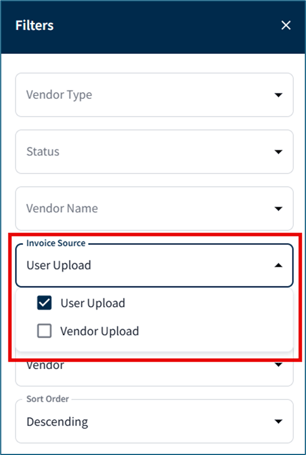
From Vendors > My Vendors > Vendors List View, filter the table by User Uploaded invoices under Invoice Source, then select the vendor from the table:
 `
`
On their profile, click Edit next to their name:
Once satisfied with the change, click Update: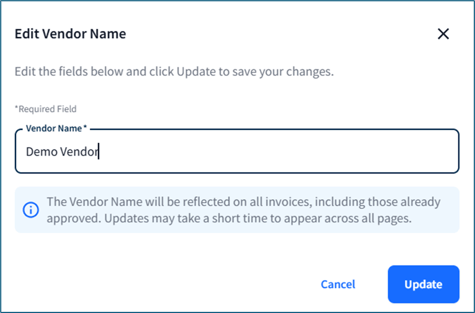
To learn more about subscriptions and uploading non-regulated invoices, click here: Managing non-regulated invoices.
Vendor IDs
Vendor IDs are used to identify a vendor in your back-office system. You can request Fintech to require a vendor ID for a relationship to go live or set this attribute as optional. This identifier can be any set and as many unique characters as you want.
💡 The Edit button will only be available for companies who have Vendor ID enabled.
To add or edit a vendor ID:
- Go to Vendors > My Vendors > Vendor List View and select a vendor from the table.
- On the next page, click on the Edit button in the top right corner of the screen:

Click the ellipses on the table header to add the Vendor ID column:
Download Relationship Data
Click the Download button to save a CSV file of either table in the two tabs:

Vendor List will have the data from the table in Vendor List View, and Relationship List will include table data from Relationship List View.