
The non-alcohol products your company buys include anything that is not state-regulated, such as non-alcoholic beverages or food, office supplies, sundry items (toiletries, napkins and other household goods), etc.
The Invoices > Manage Invoices section is an add-on service that shows a list of your manually uploaded non-alcohol invoices. If you have a Premium subscription, you can upload, approve, and store invoices. A Premium Plus subscription allows you to schedule payments.
Specifically, you can:
- Upload new invoices, which will automatically scan your invoice data into the system.
- Review and edit an invoice for accuracy, either by summary or line by line and approve for further processing.
- If subscribed to Premium Plus, schedule the invoice for payment. For more information, see Scheduling Payments.
Users need an advanced or higher role to perform these functions.
Watch the short video below for an overview on uploading, approving, and paying non-alcohol invoices:
Uploading Non-Regulated Invoices
To upload a non-alcohol invoice:
- Click on the Upload New Invoice button at the top right of the screen above the search bar.
- Choose a location by searching for a name or address, or by choosing from the populated list.
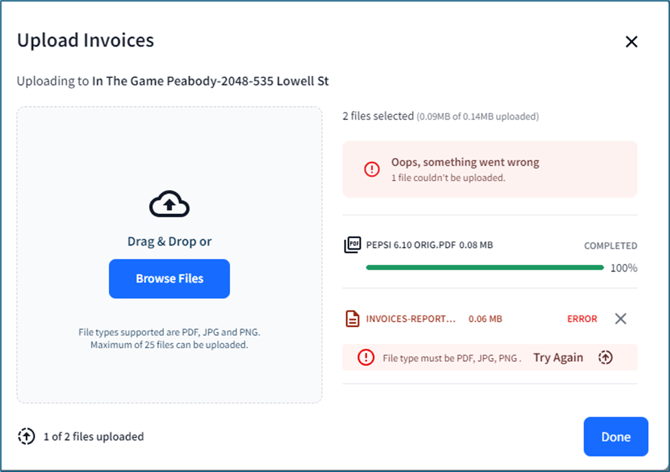
- Drag and drop the file into the respective file dropping area (gray box) or click the Browse Files button to search for the file on your computer.
⚠️ Files must be PDF, JPG, or PNG format and a max of 30 MB. You can upload up to 25 files at a time. If a file fails to upload, the issue will be noted beside it. Click Try Again to upload a new file:
Uploaded invoices will appear within the Invoices > Manage Invoices section of the portal within 24-48 hours from time of upload.
Review and Approval
For a more detailed review of the invoice approval process below, click here: Editing uploaded non-regulated invoices.
⚠️ Non-alcohol vendor-submitted invoices can only be seen in My Invoices. If you are subscribed to a Premium Plus plan and pay the vendor by check or outside of Fintech, you can edit the invoice's payment date.
Read more here: Scheduling payments for non-regulated invoices.
After uploading a non-alcohol invoice:
- Click on an invoice with a Needs Review status in Invoices > Manage Invoices. You can filter the table by status if needed:

⚠️ If an invoice has an Error status, hover over the i icon to review the reason for the failed upload. Depending on the error, you will have to edit the invoice or select, delete, and re-upload:

- Review, add, or edit vendor information, payment method, the invoice summary, line items, and the payment schedule. Learn about invoice editing and payment options in the following articles: Editing Vendor Invoices and Options to Pay Invoices:

⚠️ Within Invoice Detail, you can assign a Product Code (also referred to as Vendor Item #) to an item. Confirm this number matches the item's product code in your back-office system. If you leave the field blank, our platform will use the product's retailer item number as a placeholder if available.
The retailer item number can be edited in the Product Catalog.
- Approve the invoice when ready and schedule payment either now or later:

- Scheduling Payments Immediately - Choosing Schedule Now allows you to review bank details and choose a payment date. After being scheduled, the invoice will move to My Invoices, where you can edit the scheduled payment date again if needed.
- Scheduling Payments for Later - Choosing Schedule Later will approve and move the invoice to My Invoices, where payment will need to be manually scheduled.
💡 You can streamline your invoice uploading process by using the Auto-Approve and Auto-Pay features.
💡 Vendor names can be updated even after an invoice has been approved. Read more under Editing Vendor Details in Managing vendors and distributors.
Filtering and Sorting
The table is automatically filtered by the last 30 days of invoices received and assigned with the following statuses:
|
Status |
Description |
|
Processing |
Scanned invoice is being processed for accuracy (about 24-48 hours). |
|
Needs Review |
Invoice has been processed and requires retailer’s approval. |
|
Scan Error |
Problem occurred during processing. Errors will include the likely issue. |
The table can be further filtered and sorted in the following ways:
- Choose a specific store location using the location dropdown element at the top of the page.
- Use the search bar to populate an invoice from a specific distributor.
- Click on the filter button near the search bar to open the filter pane, where you can choose a column to sort by and a sort order.
- Change the sort order of a column within the table by clicking on the column’s name in the header row.