
What is Auto Pay?
For non-alcohol invoices, you can eliminate the need to schedule payment by using auto pay. This feature is designed for businesses handling non-alcohol invoices and subscribed to Premium Plus.
(If you process alcohol invoices and want to pay earlier than the due date, see Paying Regulated Invoices Early. It is not possible turn off automatic payment processing when it comes to alcohol invoices.)
Once the invoice has been approved, payment can be auto-scheduled before or on the due date depending on how the vendor is paid:
- ACH: Scheduled on the invoice's due date.
- Check: Scheduled two days before the invoice's due date (accommodates USPS delivery time).
- Payments made outside of Fintech: No date will be scheduled; the invoice status will be updated to Paid. Users are responsible for confirming the vendor has received payment when using resources outside of Fintech.
💡 For vendor-submitted non-regulated invoices, you must be subscribed to a Premium Plus and pay the vendor by check or outside of Fintech (Non-EFT relationship) to use auto pay.
💡 For non-regulated invoices uploaded in Manage Invoices, you must be subscribed to Premium Plus to use Auto Pay. Read more about uploading invoices: Uploading and Managing Non-regulated Invoices.
Before you can enable auto pay, you need to have had at least one non-regulated invoice that has either been approved or paid through the Fintech Portal.
Enabling auto pay will apply to all locations served by that vendor. If payment preferences are not established for a location, Auto pay will not apply to them. For more information on setting payment preferences, click here: What options do I have to pay invoices?
Enabling Auto Pay
To activate the auto pay feature:
- Go to Vendors > My Vendors.
- Choose a vendor from the list.
- Find the Automated Invoice Payment message, then click the Let’s Activate button:

- Click Activate:

⚠️ If the invoice amount exceeds the Default Maximum Payment set in Settings > Payment Preferences > Non-Regulated tab, the Auto Pay feature will not work for that invoice. You will then have to adjust the max amount and reschedule manually.
💡 Learn more about adjusting maximum payments: How do I manage non-regulated payments?
💡 Not sure how to schedule non-regulated invoice payments: Where can I schedule and manage payments on invoices?
After clicking Activate, you will be prompted to provide feedback on why you are using Auto Pay. Feedback helps us to improve the feature, but it is not required.
Auto Pay Notifications
Users with advanced or administrative roles will receive an email with the 3 most recent invoices per vendor that were scheduled for auto pay the day prior. Review auto pay invoices for your vendors by clicking Go to My Account:

What if Auto Pay Fails?
Auto pay will fail for an invoice if the maximum payment amount is exceeded or payment from the bank cannot be processed. You will then have to reschedule the payment manually.
You will be notified that an invoice failed Auto Pay in three ways:
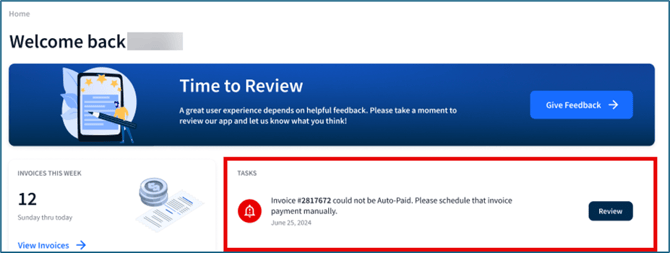
- Home > Tasks widget - Clicking Review will redirect you to the invoice with failure details:
- Invoices > My Invoices - The invoice number will be red. Hover over the i icon or open the invoice to view failure details:

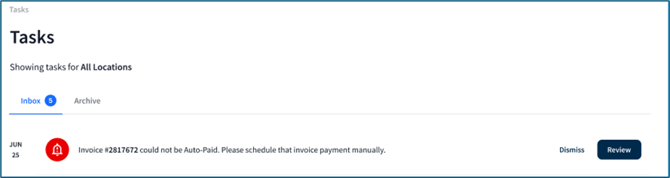
- Tasks tab - Click Review to see failure details or Dismiss to archive the task. You will still need to manually schedule a payment if you Dismiss the task:
Deactivating Auto Pay
⚠️ Invoices with a Scheduled status will not be affected when deactivating Auto Pay; payments will still be made on the assigned date.
💡 If there are invoices with an Approved status, you will need to manually schedule payment. Review and confirm payment schedules in Invoices > Manage Invoices.
To deactivate auto pay:
- Go to Vendors > My Vendors.
- Choose a vendor from the list.
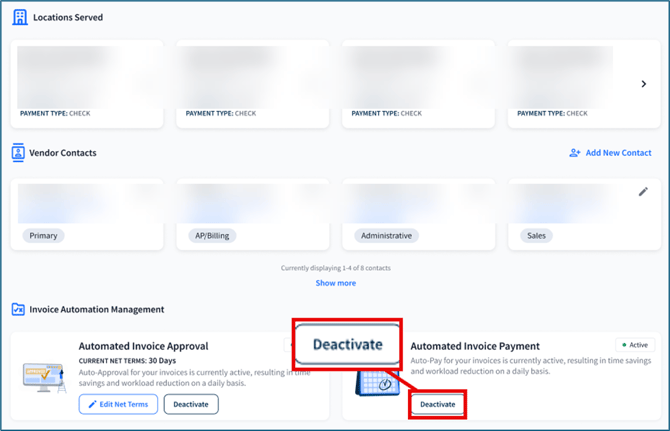
- Find the Automated Invoice Payment message, then click Deactivate to begin the process:
- Provide feedback, then click Deactivate:

Using Auto Pay and Auto Approve Together
You can use both the auto pay and auto approve features together. This eliminates the need for manual invoice approval and payment scheduling. When auto approve is enabled, Fintech will review, edit, and approve invoices on your behalf. For more details, refer to the following article: How can I automate invoice approval?