
What is Auto Approve?
When you upload a non-regulated invoice through Manage Invoices, the system reviews and verifies that the invoice data was recorded into the portal correctly. The invoice then receives a Needs Review status, indicating that a manual review and approval is required before payment can be scheduled.
Using the auto approve feature, user-uploaded non-alcohol invoices can be automatically Approved, eliminating the need for manual review. This allows you to schedule payments and send money to your vendors more quickly.
💡 Auto approve cannot be disabled for either regulated or non-regulated vendor-submitted invoices.
⚠️ To enable auto approve for your uploaded non-alcohol invoices, you must have a subscription to either Premium or Premium Plus and also have had at least one invoice approved or paid through the portal. Learn more about invoice statuses: Where do I upload and manage my invoices? and Scheduling immediate payment on uploaded non-regulated invoices.
Enabling the Auto Approve Feature
To start using auto approve:
⚠️ Enabling auto approve for a vendor will apply this feature to all locations they serve.
- Go to Vendors > My Vendors.
-
Choose a vendor from the list that you upload non-regulated invoices for.
- Find the Automated Invoice Approval message, then click the Activate Now:
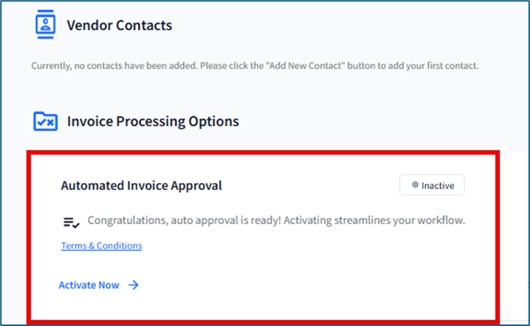
- Determine your Net Term, then click Activate:

💡 If an invoice does not specify a due date, the platform will generate one by adding the Net Term value (i.e., the number of days specified) to the invoice creation date).
For instance, an invoice created August 1st with a net term of 10 days will be due on August 11th. Please confirm that the net term value aligns with your agreed payment terms with the vendor.
- After clicking Activate, you will be prompted to provide feedback on why you are using auto approve. Feedback helps us to improve the feature, but it is not required.
Changing Auto Approve Settings
Edit Auto Approve
You can edit or deactivate the auto approve feature:
- Go to Vendors > My Vendors.
- Choose a vendor from the list.
- To edit:
- Find the Automated Invoice Approval message, then click Edit Net Terms:

- Edit the Net Term value, then click Confirm.

- Find the Automated Invoice Approval message, then click Edit Net Terms:
Deactivate Auto Approve
To deactivate:
⚠️ Deactivating auto approve will make invoices with a Processing status change to Needs Review. You will need to manually edit and approve the invoice. Manually schedule the payment if you do not have Auto Pay active.
- Find the Automated Invoice Approval message, then click Deactivate to begin the process:

- Provide feedback, then click Deactivate:

What if Auto Approve Fails?
The portal confirms that all required invoice details are present on an uploaded invoice before marking it as eligible for auto approve. If an uploaded invoice is unreadable or missing information, you cannot use auto approve:
| Vendor Information | Invoice Summary | Invoice Detail (Products) |
|
Vendor ID Vendor Name Vendor Address |
Invoice Number Invoice Amount Invoice Date Due Date |
Description Qty Price Amount |
Users who uploaded the invoice and those with Advanced or higher roles will be sent an email with details on the 3 most recently failed invoices, associated location(s), the user who uploaded the invoice(s), and a link to the invoices with an Error status.
These invoices will display an info icon next to the status explaining the error when hovered over. They may also display the invoice number (if available) in red font. Fixing the error requires manual editing and approval.
To learn how to manually edit invoices, click here: How do I make changes to a vendor invoice?
Using Auto Approve and Auto Pay Together
You can use both the auto approve and auto pay features together. This eliminates the need for manual invoice approval and payment scheduling of uploaded invoices. When auto pay is enabled, the portal will automatically set a payment date after an uploaded invoice has been approved. For more details, refer to the following article: How can I automate payment scheduling?