
If your company has a Premium or Premium Plus subscription in the Fintech Portal, you can upload, review, edit, approve and schedule payment for non-regulated (non-alcoholic) invoices under Manage Invoices.
Read below for more detailed information regarding the invoice approval process (Uploading and Managing Non-Regulated Invoices).
⚠️ Non-regulated vendor-submitted invoices can only be seen in My Invoices. If you are subscribed to a Premium Plus plan and pay the vendor by check or outside of Fintech (Non-EFT relationship), you can edit the invoice's payment date, but nothing more. Read more here: Scheduling payments for non-regulated invoices.
Managing Invoices
Choose an invoice from Invoices > Manage Invoices. At any point during the review, you can:
- Change the invoice’s location.
- Complete payment preferences.
- Save your work and finish later.
- Return to the Invoices > Manage Invoices section by closing the edit screen. This reverts changes to the current screen while changes made on prior screens are saved.
- Delete the invoice entirely.
The right side of the screen will show a step-by-step way to edit the invoice. You can move backwards and forwards by clicking on the tabs:
For the steps outlined below, follow along with the video:
Approve Vendor Information
If the system recognizes a new vendor on an uploaded invoice, you have to review the vendor's details before you are able to edit the invoice.
- (00:10) Confirm that the invoice location is correct.
- Choose whether the vendor is new to your account (Scan Result) or review the list of possible vendor matches (Suggested Vendors), then click Continue:

- Depending on your choice in step 2, follow a or b:
- (00:40) If you chose Scan Result, a new vendor will be created with the address information found on the invoice. Edit or approve the Vendor ID, Name, and Address fields:

While editing, we can help populate these fields for you with options to choose from in the Search Results list. If you still don't find the result you need, you can add the text as an option to choose from when editing future invoices by clicking +Create:
Click Next, then Create Vendor:
- If you chose from Suggested Vendors, you will be able to either edit or review their account details. If you choose to edit an already existing vendor's information, these changes will only reflect on current and future invoices but not change past invoices that have been created. Be sure your edits are correct before clicking Next.
- (00:40) If you chose Scan Result, a new vendor will be created with the address information found on the invoice. Edit or approve the Vendor ID, Name, and Address fields:
- (01:31) If you selected a suggested vendor on the previous screen, review and approve the location, vendor, and payment preference details. If you created a new vendor, you can set up their payment preferences on this page now, or choose to do so later:

- (01:40) Complete payment preferences now - Follow the on-screen guide to choose a payment type (Payment Options for Non-Regulated Invoices), to choose a payment method (Adding or Updating a Bank Account), and to set a maximum payment amount (Set Up Non-Regulated Payment Rules).
- Set up payment preferences later - The payment for the invoice will need to be manually scheduled. Read more here: How do I schedule payments at a later time?
- (02:32) Once vendor details and payment preferences have been reviewed, you will now be able to edit and approve the scan results of the uploaded invoice. Refer to Approve Invoice Tabs below for more information.

To cancel all changes and the start the approval process over, click X in the top right corner of the editor.
Approve Invoice Tabs
Invoice Summary
(02:31) You can change details on the invoice summary, including:
- Invoice number
- Total amount (you will be alerted if you enter an amount different than invoice)
- Tax (this is an optional field)
- Invoice Date (this is the date the invoice was scanned in)
- Invoice Due Date (from the invoice itself)
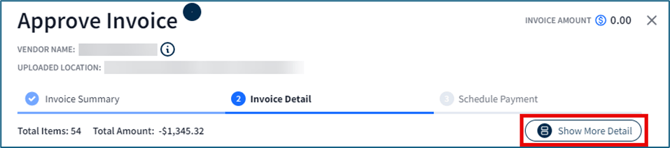
Invoice Detail
(03:05) Here you can edit the line items and correct any issues. Some important information:
- Fields in red require information.
- If you assign a Product Code (or Vendor Item #) to an item, confirm that it is the same number for the item used in your back-office system. If you leave the field blank, our platform will use the product's Retailer Item Number as a placeholder if available. The Retailer Item Number can be found and edited in the Product Catalog.
- The Amount field appears yellow when the amount does not equal the quantity * price. (You can still approve the invoice, however).
- You can click Show More Details to modify other fields not shown, such as the item's PPC and unit of measurement (U/M), as well as make adjustments:
 An adjustment to an item may affect invoice's cost. Adjustments can include:
- Promotional discounts
-
- Freight charges or Delivery charges
- Charge CRV
- Deposits
- State, county, or city taxes
To add an adjustment:
- Click Show More Detail:
- In the row(s) requiring an adjustment, click the double arrow to show the adjustments window, then click Apply once your edits are complete:

- If you are satisfied with the invoice, click Save, then Next to continue the invoice approval process:

Schedule Payment
(03:12) If you are a client who has the Payment Module enabled, you can either choose to schedule a payment now, later, or pay outside of Fintech:
- Payment Options for Non-Regulated Invoices
- How do I schedule payments as soon as I approve an invoice?
- How do I schedule payments at a later time?

⚠️ REMEMBER: If you choose Schedule Later, the payment for the invoice will need to be manually scheduled.
Final Step
(03:41) Review the edited invoice. If you have more changes to make, click Back to Edit in the bottom left corner. Once satisfied, click Approve and Pay: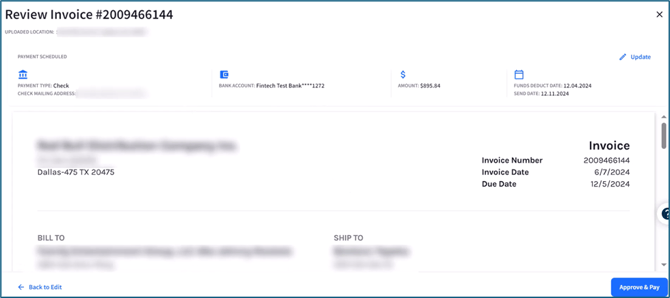
💡 Vendor names can be updated even after an invoice has been approved. Read more under Editing Vendor Details in Managing vendors and distributors.