
Users with Admin or Super Admin access can invite and manage users in the Fintech Portal. The 4 user types and their permissions include:
-
Super Admin
- Invite users and assign any user type including Admin and Super Admin
- Activate and inactivate users
- Manage account subscription
- Configure bank accounts and distributors
- Admin
- Invite users and assign Advanced or Basic User Type
- Manage account subscription
- Configure bank accounts and distributors
- Advanced
- Manage account subscription
- Configure bank accounts and distributors
- Basic
- View website data only
To view the user matrix:
- Go to Settings > Users.
- Click Invite User in the top right corner of the page.
- Select the i icon next to User Type:


Basic Searching and Filtering
View users for all of your locations or users that have access to a specific location using the location drop-down at the top of the page: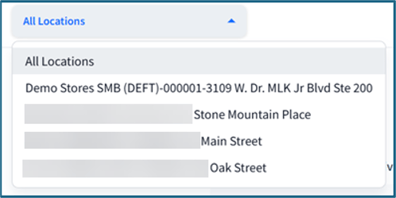
The search and filter options will help find specific users based on their Name, Email, or Status (Active or Inactive):
In the Name column, you can click on the user's name to quickly open the profile editor: 
To return to Users from the editor, click the back button in your browser. For detailed instructions on using more grid controls, see Grid Navigation.
Parent Child Company User Management
If your organization has a parent and child companies, user management depends on the company you are an Admin or Super Admin for.
Admins and Super Admins of the parent company can invite and manage users for the parent company and its individual child companies. Admins and Super Admins of a child company can only invite and manage users for that child company.
When inviting users:
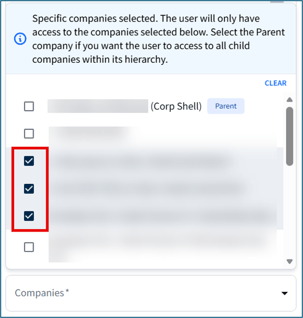
- From the parent company, users can be given access to the parent and all child companies, or only selected child companies.
- When inviting a user from the parent company, the selected User Type permissions will apply to all companies they are invited to:
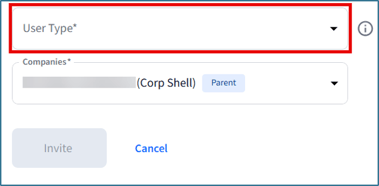
- Users can be invited at the child company level and assigned a different User Type for each child company. When a user has multiple user types, their highest user type is displayed in Settings > Users.
- A Company column in Settings > Users will show the companies a user has access to:
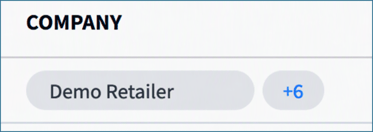
Inviting Users
To add a new user:
- Go to Settings > Users.
💡 For parent child companies: Make sure you have selected the company where you want to manage the user. To change companies, click your profile icon, select Switch Company, and choose the appropriate company:
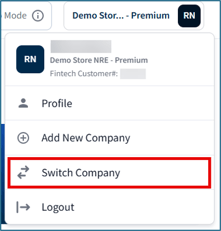
- Click Invite User in the top right corner of the page.
- Enter the user’s information, including first and last name, email, phone number, and title:
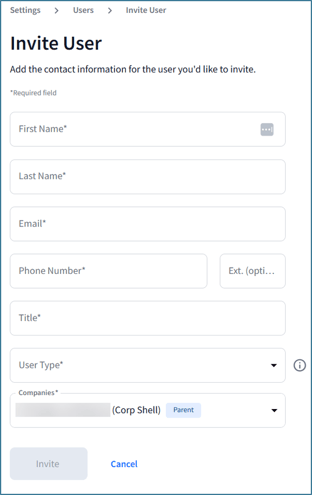
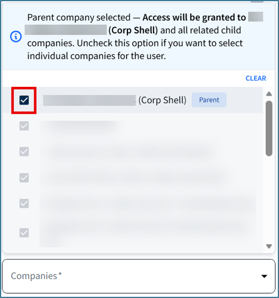
- If your company has a parent-child setup, use the Companies dropdown and either:
- Keep the parent company selected to give the user access to the parent and all child companies:
- Deselect the parent company and select the child companies you want to give the user access to:
- Keep the parent company selected to give the user access to the parent and all child companies:
- Select a User Type.
- Click Invite.
The invited user will receive an email with instructions to complete registration.
Editing User Accounts
When managing users, keep the following restrictions in mind:
- Super Admins can update the profile, user type, and status of Super Admin, Admin, Advanced, and Basic users.
- Admins can update the profile, user type and status of Advanced and Basic users.
- Super Admins cannot inactivate themselves. Another Super Admin must do this for them.
- Email addresses CANNOT be updated in the portal. Contact Client Services to change a user's email address.
- Passwords must be reset by the user. Admins and Super Admins cannot reset another user's password.
- From the login screen, click Forgot Password.
- From the portal, click your profile icon in the top right corner of the page (your initials.
Additional information for Parent Child Companies:
- Changes made from the parent company will apply to all companies the user can access.
- Changes made from a child company will only apply to that company.
- Access to the parent or individual child companies can be removed without affecting access to other assigned companies.
⚠️ Inactivating a user removes access to all assigned companies:
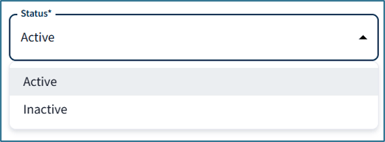 To remove access to specific child companies only, open the user editor, select the Companies dropdown, and deselect the companies you want to remove.
 💡 If a user has access to at least one company (parent or child), they will continue to appear as Active in Settings > Users.
Editing a User Account
To update a user’s info, status, or type:
- Go to Settings > Users.
- Within the grid, click either the user's name or the pencil icon
 at the end of the row.
 - Make adjustments, then click Save Changes.
💡 Inactivated users remain listed in Settings > Users but cannot access the portal or receive account emails.
💡 Inactivated users can be reactivated. Once reactivated, they can log into the portal and receive alerts again.