
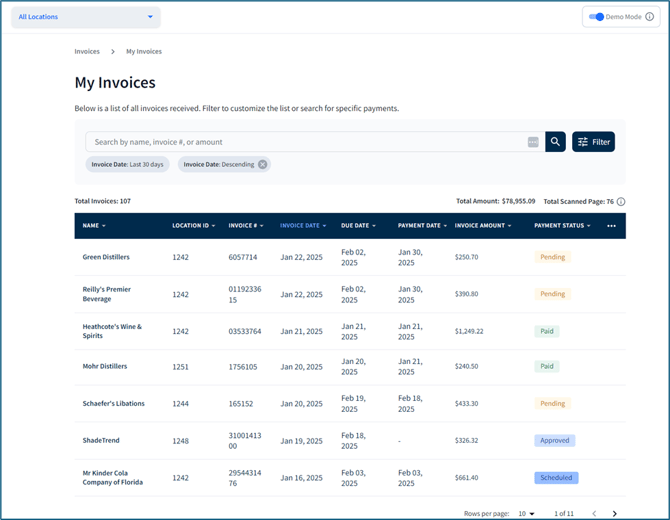
Within Invoices > My Invoices, you can:
- View all regulated and non-regulated (non-alcoholic) invoices submitted by vendors, as well as user-uploaded non-regulated invoices in Manage Invoices.
⚠️ Uploading non-regulated invoices to your retailer account is only possible with a premium subscription: AP Automation.
- Filter invoices by specific location.
- View the sum of all received invoices.
- View notifications regarding invoices that need approval.
- Use search and filter options to find specific invoices.
- Download and/or export invoices (premium subscription required).
Each invoice appears as a row within the table. The Invoice Amount column shows what is owed by the retailer in black font, while retailer credits are in red font:
Payment Statuses
Below are invoice status definitions and recommended actions to take:
| Term |
Definition |
||
| Approved |
All vendor-submitted regulated and non-regulated invoices will be automatically assigned an Approved status. If a vendor submits an invoice that is older than 30 days, you will be required to view and approve it before payment is scheduled: 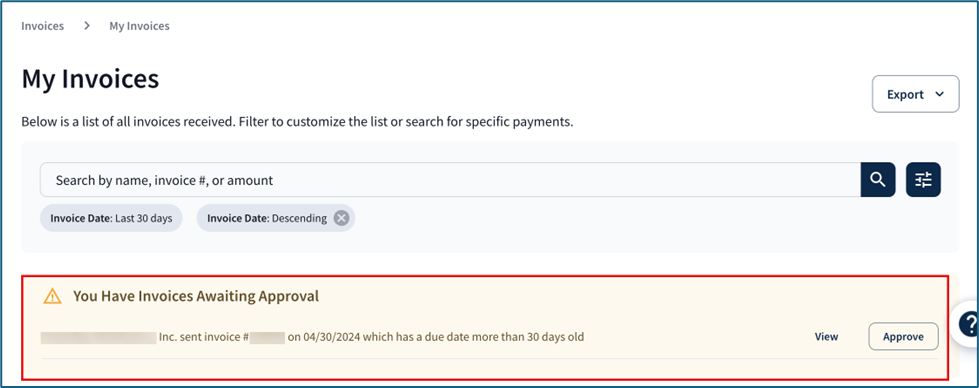 For user-uploaded non-regulated invoices, you will need to manually review and approve the invoice under Manage Invoices. Read more: Where do I upload and manage my invoices? |
||
| Scheduled |
A payment date has been scheduled for an approved invoice. This date can be seen in the Payment Date column.
|
||
| Funding in Progress |
When money is actively being deducted from the retailer's bank account for check or ACH payment. The date can be seen in the Withdrawn Date column. |
||
| Funded |
Money has successfully been deducted from the retailer's bank account for a check payment. |
||
| Released |
When the retailers ACH payment has been released and is moving to the vendor's account (processed in 2 to 4 days), or if Fintech generated the check, this is the date it's mailed to the vendor (Processed in 24 to 36 hours). |
||
| Paid |
The vendor successfully received the retailer's payment for an invoice. |
||
| Refunding |
A payment has been stopped, and funds will be deposited within 2-4 business days. |
||
| Failed |
The retailer's payment to the vendor for the invoice was declined. Click on the invoice's row to see further details regarding what the error may be. Under Payment Information, click the Fix Issue button, and select a fix option:
|
 Need help adding payment methods? Click here:
💡 If you notice a mistake on an invoice, you can send an inquiry to the vendor through the portal. Learn more: Reviewing Payment Activity.
Table Filtering
The invoice list is automatically sorted by the most recent invoice date within the table. Use the search bar to look up specific invoices by name, invoice number, or invoice amount.
View invoices for all of your locations, or choose to only see a specific location using the location drop-down:
You can sort the table by the columns listed by clicking a column header. Add columns to the table by clicking the ellipses at the end of the header row:
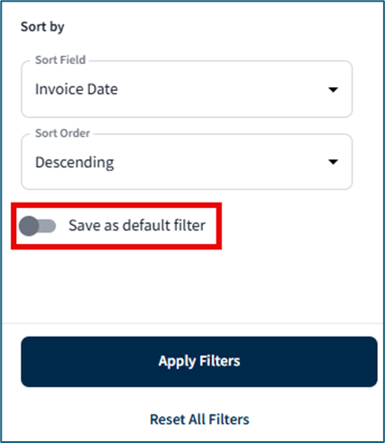
Select the filter button near the search bar to further organize the table:

Set the chosen filters as your default view by toggling Save as default filter, then click Apply Filters. You can also clear all filters selected by clicking Reset All Filters:
💡 Non-Alcoholic Vendor Type includes vendors that submit non-regulated invoices to your Fintech account, as well as non-alcoholic invoices you've uploaded with Fintech's APA feature included with Premium and Premium Plus.
If you'd like to read more about Fintech's non-regulated invoice processing feature, click here: AP Automation.
View plan information here: Subscriptions FAQ.
How to View Invoice Details
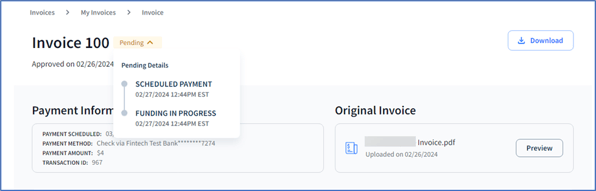
Click on an invoice to view status history and payment information:
To print or download a PDF copy of an invoice, or view an original copy of a non-regulated invoice, you must have a pro or higher subscription. After downloading, you can open the file and print from your default program.
💡 Quickly download Approved invoices from the My Invoices page by hovering over a row:

The invoice details page also shows an electronic copy of the invoice, and towards the bottom, the Invoice History, which includes the date, time, and person responsible for uploading, approving, and actioning payment:

💡 For regulated invoices, invoice approval and payment are handled automatically by the system. These actions are recorded under Invoice History as "Invoice approved by Auto Approval" and "Payment scheduled by Auto Pay...", respectively.
For non-regulated vendor-submitted invoices, approval is also handled automatically by the system, but for payment scheduling, there will be a user listed.
Exporting Invoice Data
You can export summary invoice data by month using the Export feature in My Invoices. The amount of data exported depends on your subscription level - click here if you'd like to expand the Fintech Portal's available services.
To export invoice data:
- Click the Export button in the top right corner of the page.
- Choose whether you want to download a PDF or CSV file of the data.
💡 If you wish to export detailed invoice data (and are using the Fintech Portal's non-alcohol services to pay vendor invoices), you will be asked to choose between Regulated (alcohol) and Non-Regulated (everything else).

- Select the specific month and year of data you want to download. You can export 1 month at a time.
- Click the Download button.