
All approved requests from Authorization are organized in Setup for streamlined management of Price Book updates.
Within Setup, easily track which requests have been addressed and view any outstanding Price Book changes that still need action. Also, eliminate manually entering product information into your back-office system by generating and downloading Price Books for requests:
💡 Read more about approving or declining Price Book requests: Manage Vendor Price Book Requests.
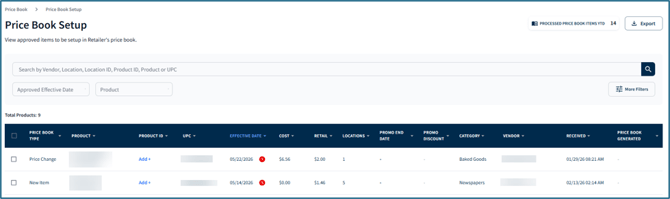
Use the search bar to find a specific request by entering a vendor's name, a location, location ID, product ID, product name, or UPC. Use dropdown filters to narrow table results by a requests effective date (Approved Effective Date) or focus on a specific product (Product).
In the top right corner of the screen, the total number of Price Book requests that have been completed in the current year will be displayed (Processed Price Book Items YTD). To download the current table view as a CSV file, click Export:

Watch the walkthrough video or continue reading below to learn more:
Editing Effective Dates
Requests for effective dates can be edited inline or in bulk.
⚠️ An effective date must be the current day or a future day.
- To begin editing effective dates, either:
- Hover over a single row and click the pencil icon:

- Select multiple rows, then click Edit Effective Date at the bottom of the screen:

- Hover over a single row and click the pencil icon:
- Next:
- For a single row, edit the Effective Date field for the selection, then click Save:

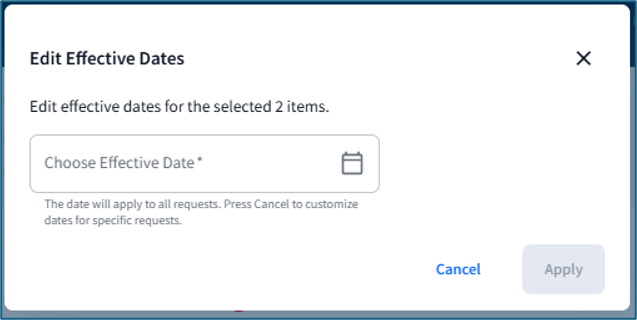
- For multiple files, choose an effective date for all selections, then click Apply:
- For a single row, edit the Effective Date field for the selection, then click Save:
Managing Approved Requests
⚠️ If a Price Book file is too large to generate in Price Book Setup, it will be sent to the Document Center for to view or download. Learn more here: Using the Document Center.
Mark as Completed
Marking a request as complete notifies the vendor(s) that the request has been approved and commits the change to SBT's dual-approved Price Book (the price book that contains up-to-date and accurate product information).
- To mark requests as complete, either:
- Hover over a single row and click Mark as Completed.

- Select multiple rows, then click Mark as Completed at the bottom of the screen:

- Hover over a single row and click Mark as Completed.
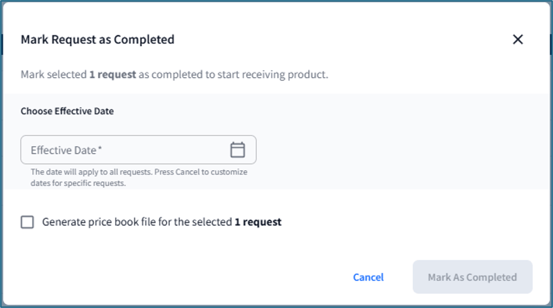
- Choose an Effective Date, then either:
- Click Mark as Completed if you do not need a Price Book file:
- If you do need a Price Book file:
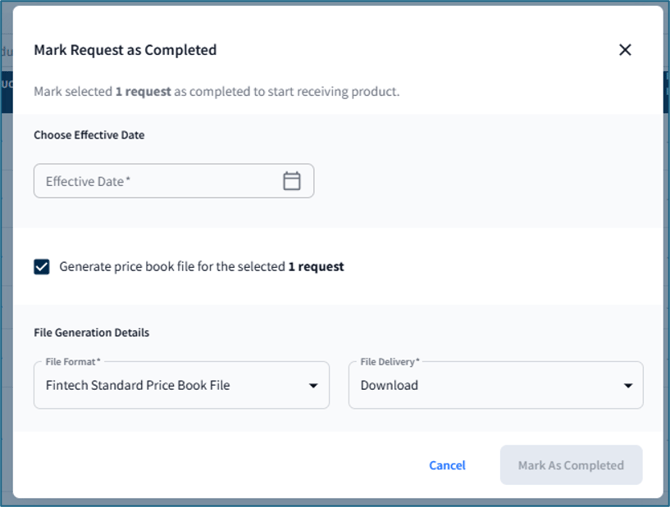
- Checkmark Generate price book file for the selected request.
- Select a file format from the File Format dropdown.
- Choose how you'd like to receive the file in File Delivery - either Download (save a file to your computer), Transmit (send a file using your configured transmission method, such as email, FTP, or AS2), or Download and Transmit:
💡 Interested in different Price Book file formats or delivery methods? Contact Support.
- Click Mark as Completed when done.
- Click Mark as Completed if you do not need a Price Book file:
Once a request has been completed, the vendor will receive an email indicating their change request has been approved and the product has been adjusted.
Price Book Files
Price Book Files and Fields
There are two file options for price books: the Fintech Standard Pricebook and a Price Book in a specific format. The Fintech Standard Pricebook is a standard file that includes the following fields:
- Price Book Type
- Product Name
- UPC
- Product ID
- Vendor ID
- Current Retail Price
- Current Cost
- Current Margin
- Effective Date
- Promo Stop Date
- New Retail Price
- New Cost
- Discount Amount
- New Margin
- Location ID
- Secondary Location ID
- District
- Zone
- Store Type
- Region
- Banner
If your products do not use all of these fields, the downloaded file will still include those columns, but they will be blank. If you plan to upload the file into your back-office system, you may need to edit it so the fields match the information you track.
If SBT has set up custom Price Book files for your account, those files will include the product fields used in your back-office system, helping you upload exports from your account more easily.
Generating a Price Book
⚠️ All selected Price Books are combined into a single file. To create separate files, select and generate a Price Book for each row individually.
-
To generate a Price Book file for a request(s), either:
-
-
Hover over a row and click Generate Price Book File:

-
Select multiple rows, then click Generate Price Book File at the bottom of the screen:

-
- Choose an Effective Date, select Fintech Standard Price Book File in File Format, then choose how you'd like to receive the file in File Delivery - select Download (save a file to your computer), Transmit (send a file using your configured transmission method, such as email, FTP, or AS2), or Download and Transmit:
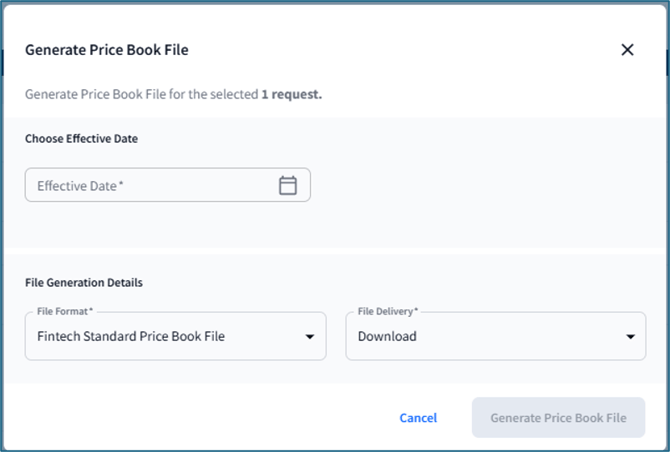
- Click Generate Price Book File when done.
Viewing Stores Associated with a Request
To view which locations are associated with a given request, hover over a row and select Locations: 
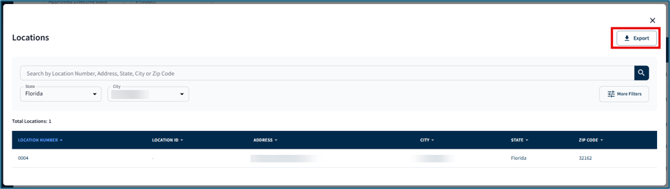
Here, each location's number and ID are displayed, along with location details. Use the search bar, state, and city dropdowns, or the More Filters button to refine table results.
You can also export the table as a CSV file. To download the list of stores in the table as CSV file, click Export in the top right corner:
💡 For a more detailed list of active locations, go to Locations: View all Locations.